The Customers page provides a comprehensive overview of all customers who have logged in to the rewards program. This page displays their accumulated points, allowing merchants to effectively manage and engage with their customer base.
Page Layout
The Customers page is organized into four main columns:
(1) Search Customer
(2) Point Balance
(3) Member Status
(4) Sorting Options
Column Descriptions:
(1) Search Customer:
This feature includes a search bar that allows you to quickly find customers by entering their names or email addresses. This makes it easy to locate specific customers without scrolling through the entire list.
(2) Point Balance:
In this column, you can filter customers based on their point balance. You have the option to enter a range of points using the ‘between’ and ‘and’ fields. This allows you to view customers with specific point totals, helping you target those eligible for rewards or promotions.
(3) Member Status:
This dropdown allows you to select the member status of the customers you wish to display. You can choose between ‘Guest’ or ‘Member’. When ‘Member’ is selected, the list will only show customers who are members of the loyalty program, making it easier to manage and engage with your most loyal customers.
(4) Sorting Options:
➝ The sorting feature allows you to organize the customer list based on various criteria:
- Updated: Sort customers by the most recent activity.
- Name: Sort alphabetically by customer names.
- Points: Sort based on point totals.
- Ascending/Descending: Choose the order in which the sorting is applied.
➝ The selected sorting option will determine how the customer list is displayed, enabling you to quickly access the information you need.
Export
This feature allows you to export customer loyalty data, like points balances, to an external file for backup, reporting, or analysis purposes.
Import Sync Points:
- Revise Customers’ Points: You can upload a CSV file to adjust customers’ loyalty points by reconciling and revising their balances.
Import Options:
- Add Points to Existing Balance: This option increases the points for existing customers based on the imported values, adding to their current balance.
- Reset Existing Customer Balance: This option replaces the current balance with the points in the file, effectively resetting the customer’s points to the new amount.
Adjustment Rationale: This feature allows admins to include an internal note explaining the reason for the adjustment. This message is only visible to admins for record-keeping purposes.
Summary
The Customers page is designed to streamline the management of customer loyalty data. With the ability to search, filter by point balance and member status, and sort the list according to your preferences, merchants can efficiently engage with their customers and enhance their loyalty program experience. This functionality not only saves time but also allows for targeted marketing and personalized customer interactions.
After clicking Customer name:
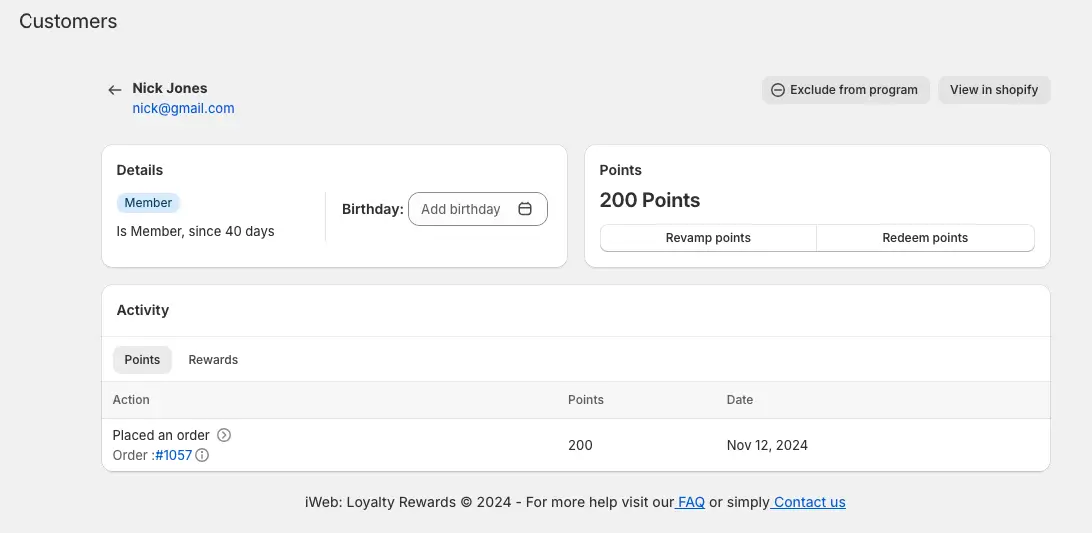
The Customer Section in the Loyalty Rewards app provides a comprehensive view of a specific customer’s details, points balance, and activity history. Here’s how you can effectively utilize this section:
- Accessing a Specific Customer’s Profile
- Navigate to the Customers section in the app.
- Click on the name of the customer whose details you want to view.
A new page will open with three primary sections:
1. Details
2. Points
3. Activity
1. Details Section
The Details section contains basic information about the customer.
- Customer Since: Shows how long the customer has been associated with your store.
- Birthday Field: You can add the customer’s birthday here if it hasn’t been added already. This helps in setting up birthday rewards or personalized greetings.
2. Points Section
The Points section allows you to manage and adjust the customer’s points balance. It includes two key options:
(A) Revamp Points
Purpose: Adjust or recalibrate the customer’s points balance.
Steps:
- Open the Revamp Points option.
- Enter the new points balance or the adjustment amount.
- Provide a reason for the adjustment (visible only to Admins).
- The system will calculate and display the updated points balance.
- Click the Adjust Points button to finalize the changes.
(B) Redeem Points
Purpose: Redeem the customer’s points for a reward.
Steps:
- Open the Redeem Points option.
- Select a reward from the Select Reward dropdown field.
- Confirm the redemption by clicking the Redeem Reward button.
3. Activity Section
The Activity section logs all the customer’s interactions within the loyalty program, including:
- Earned points
- Redeemed rewards
- Store credit transactions
This section provides a clear overview of the customer’s loyalty activity history.
Additional Options
Two more features are accessible on the right side of the page:
1. Exclude from Program
Purpose: Temporarily or permanently exclude a customer from the loyalty program.
Impact:
Excluded customers cannot access the Storefront Panel UI. They will not earn points or rewards until reinstated.
Action: Confirm exclusion after clicking the Exclude from Program button.
2. View in Shopify
Purpose: Directly view the customer’s profile in your Shopify admin panel.
Action: Click the View in Shopify button to access the Shopify customer profile.
Summary
This feature enables you to manage customer information, fine-tune points, and track loyalty activities effectively. By using the Revamp Points, Redeem Points, and Activity features, you can ensure a seamless and rewarding experience for both the customer and your team.


