
Your Shopify header sets the tone for your store, making it a critical element to captivate visitors and boost conversions. This blog will guide you through creating a stunning and functional header.
This guide will show you how to add and set your logo and customize the header menu. As a bonus, we will also show you how to edit your Shopify header through code for advanced customization.
Get ready to elevate your store’s first impression and keep a lasting impact on your audience!
Understanding the Shopify Header Section
The header is a critical UI component located at the top of every page in a Shopify store. It serves as a persistent global element, typically including key features such as the store's logo, primary navigation menu, search functionality, cart icon, and an announcement or promotional banner optionally.
For example, a header shows your logo on the left, a menu with links to "Home," "Shop," and "Contact" in the centre, and a cart icon on the right.
To customize your header effectively, you can modify it with Shopify’s Theme Editor, Liquid files (Shopify’s templating language), and some CSS or HTML for advanced designs.
How to Add & Customize Shopify Header Section
Shopify themes have a default header section, but you can customize it to make your store visible.
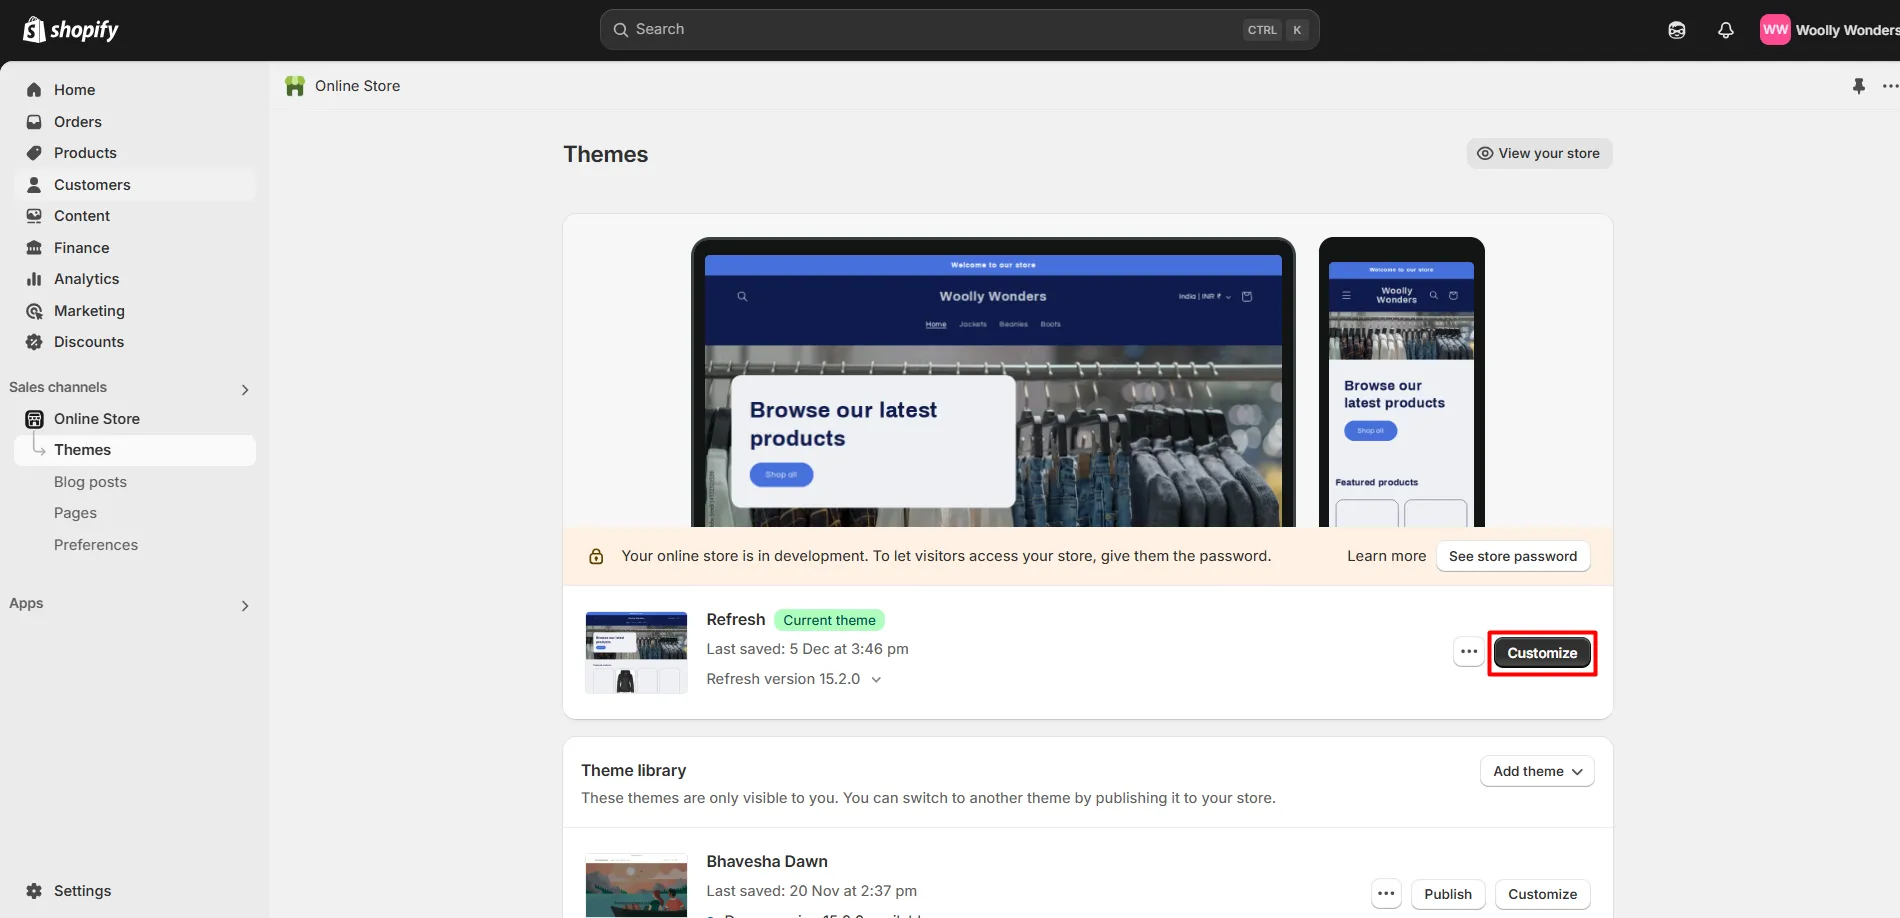
Step 1: Navigate the Shopify Store
- Go to “Online Store > Themes > Customize”
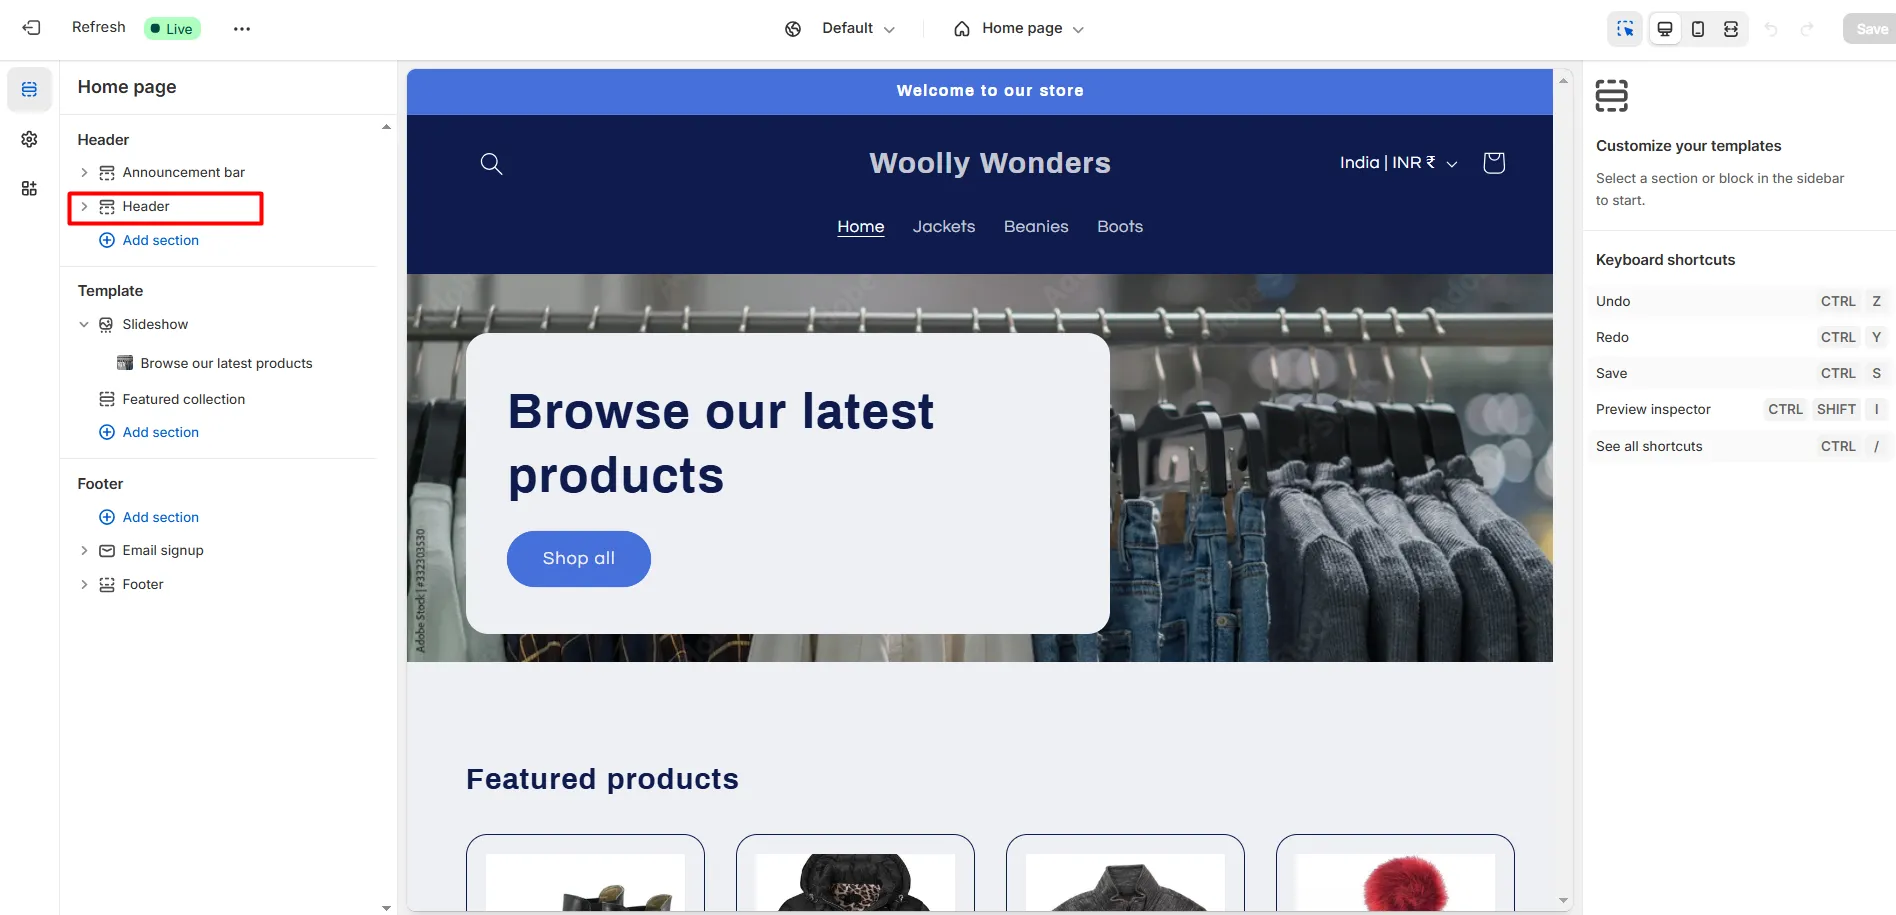
Step 2: Customize the Header in the Theme Editor
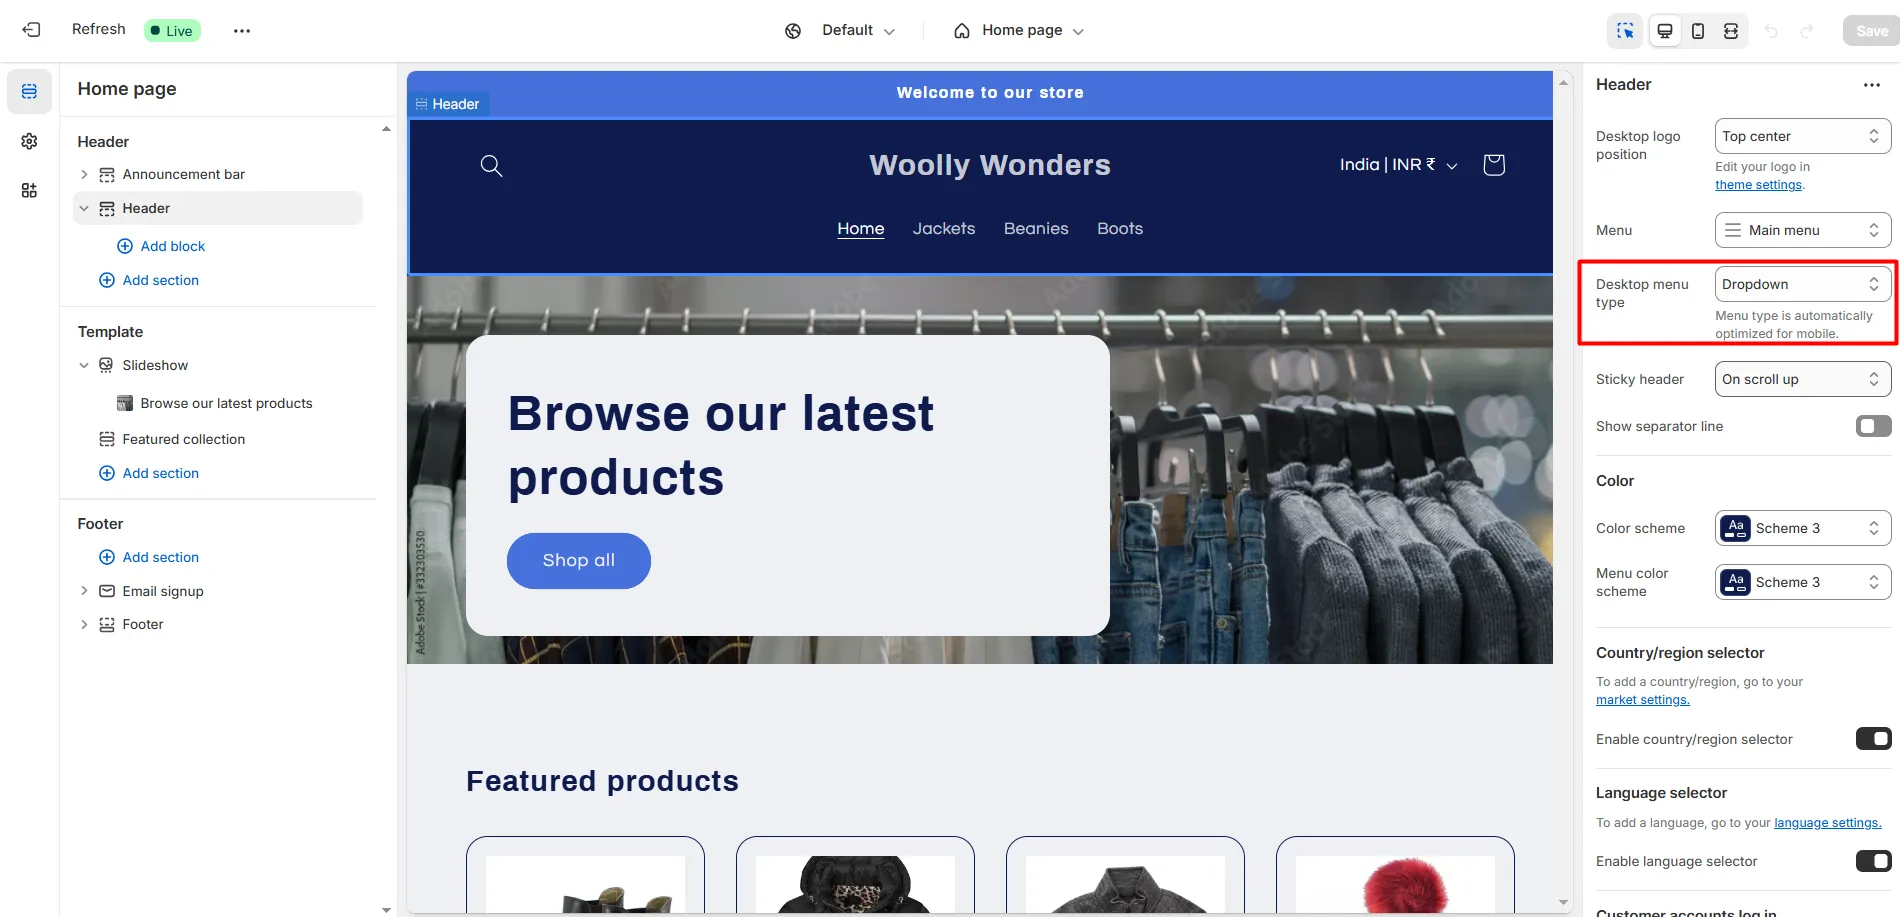
- Select Header in the left sidebar.
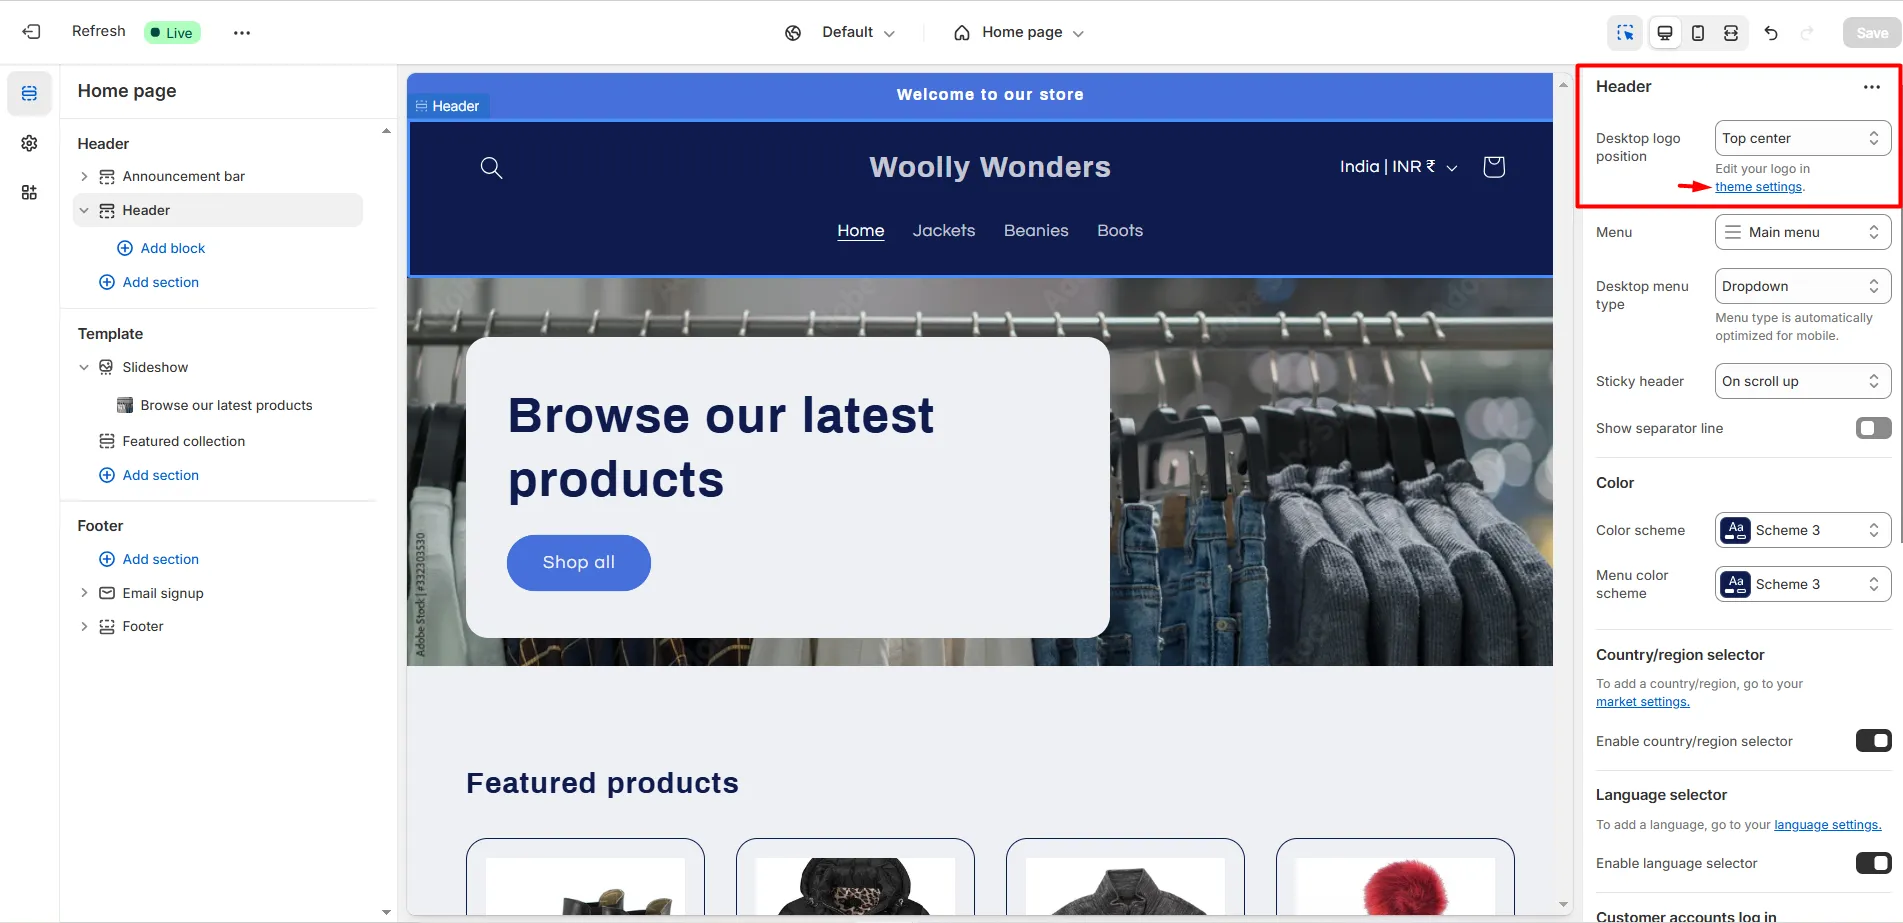
Step 3: Edit the logo in your Shopify header
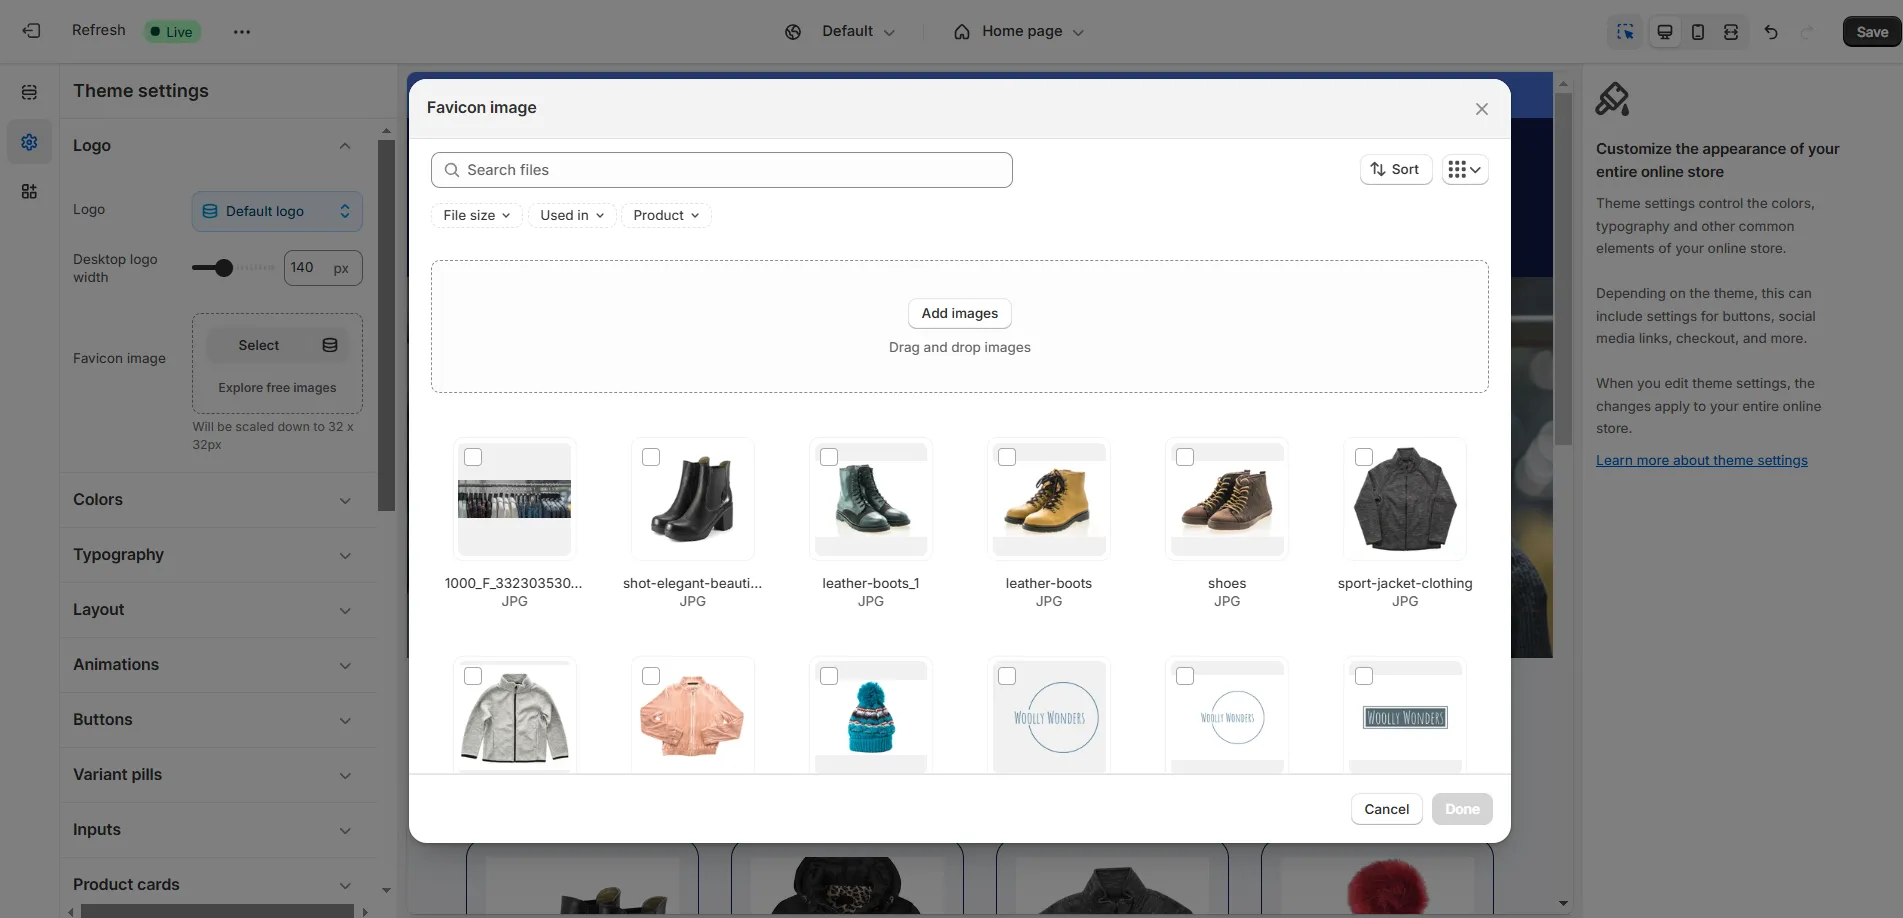
- Click on “Upload image” to choose your logo file.
- Select your logo from your library and click “Done” to add it to your Shopify header.
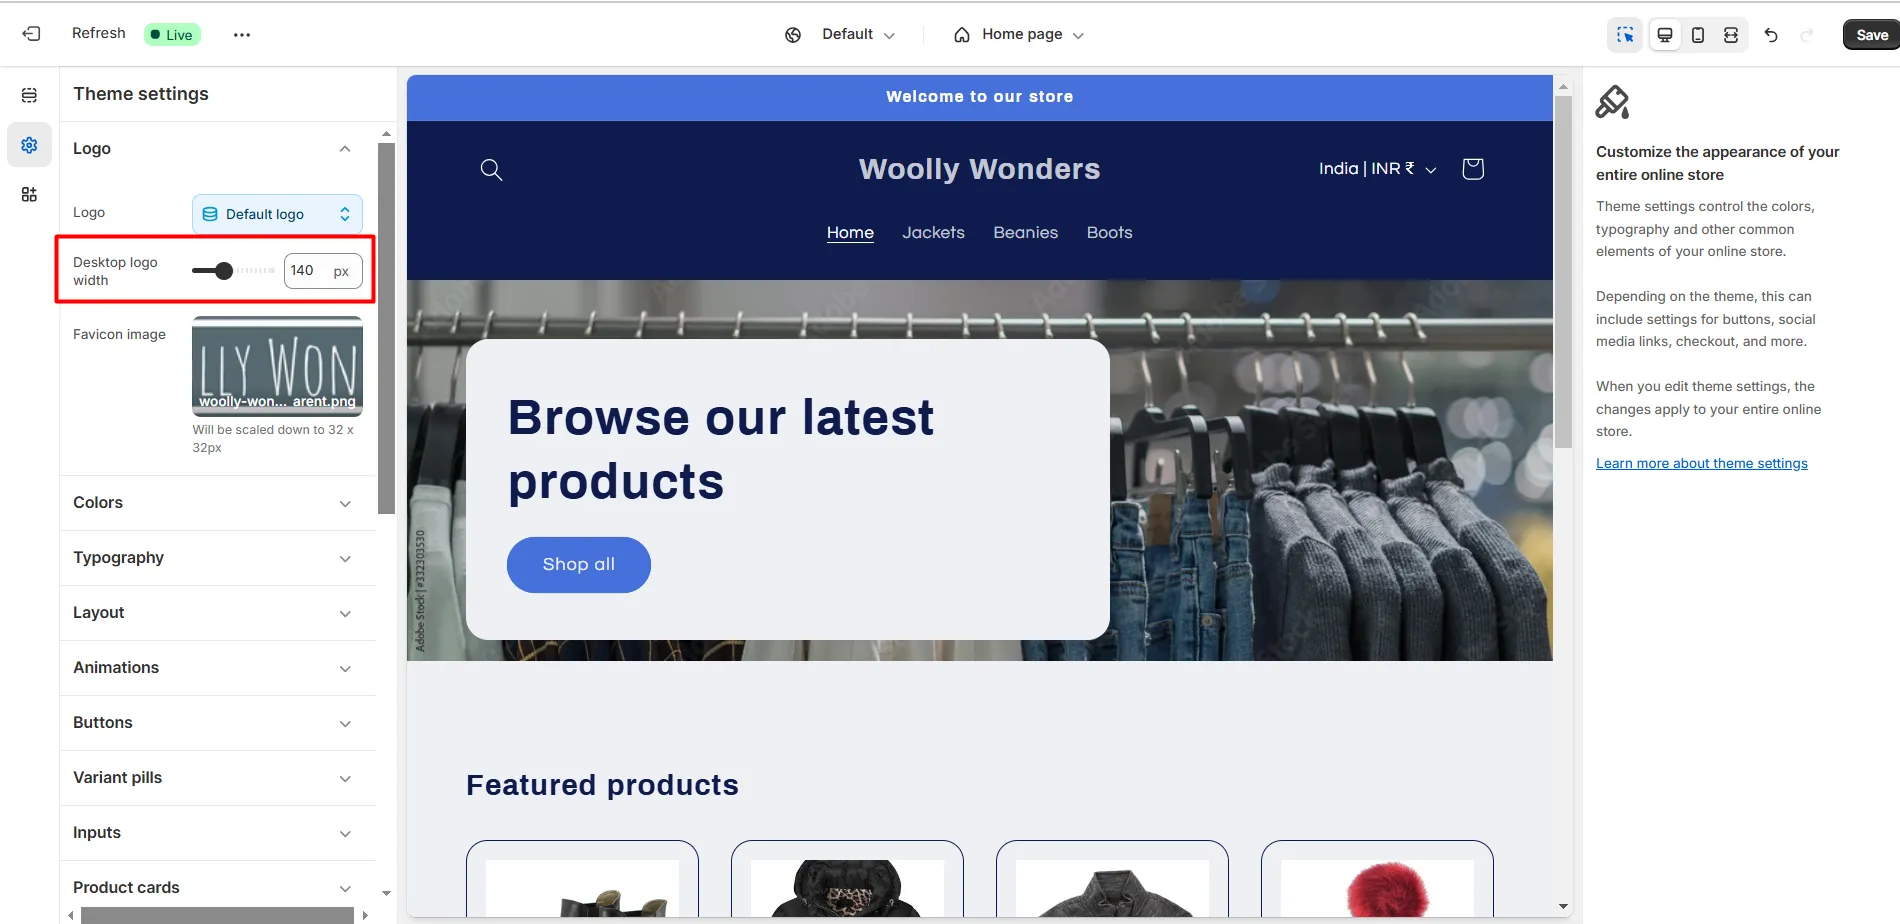
- You can customize your logo by adjusting options like logo width and position on the desktop.
Step 4: Add a Top Menu to Your Header
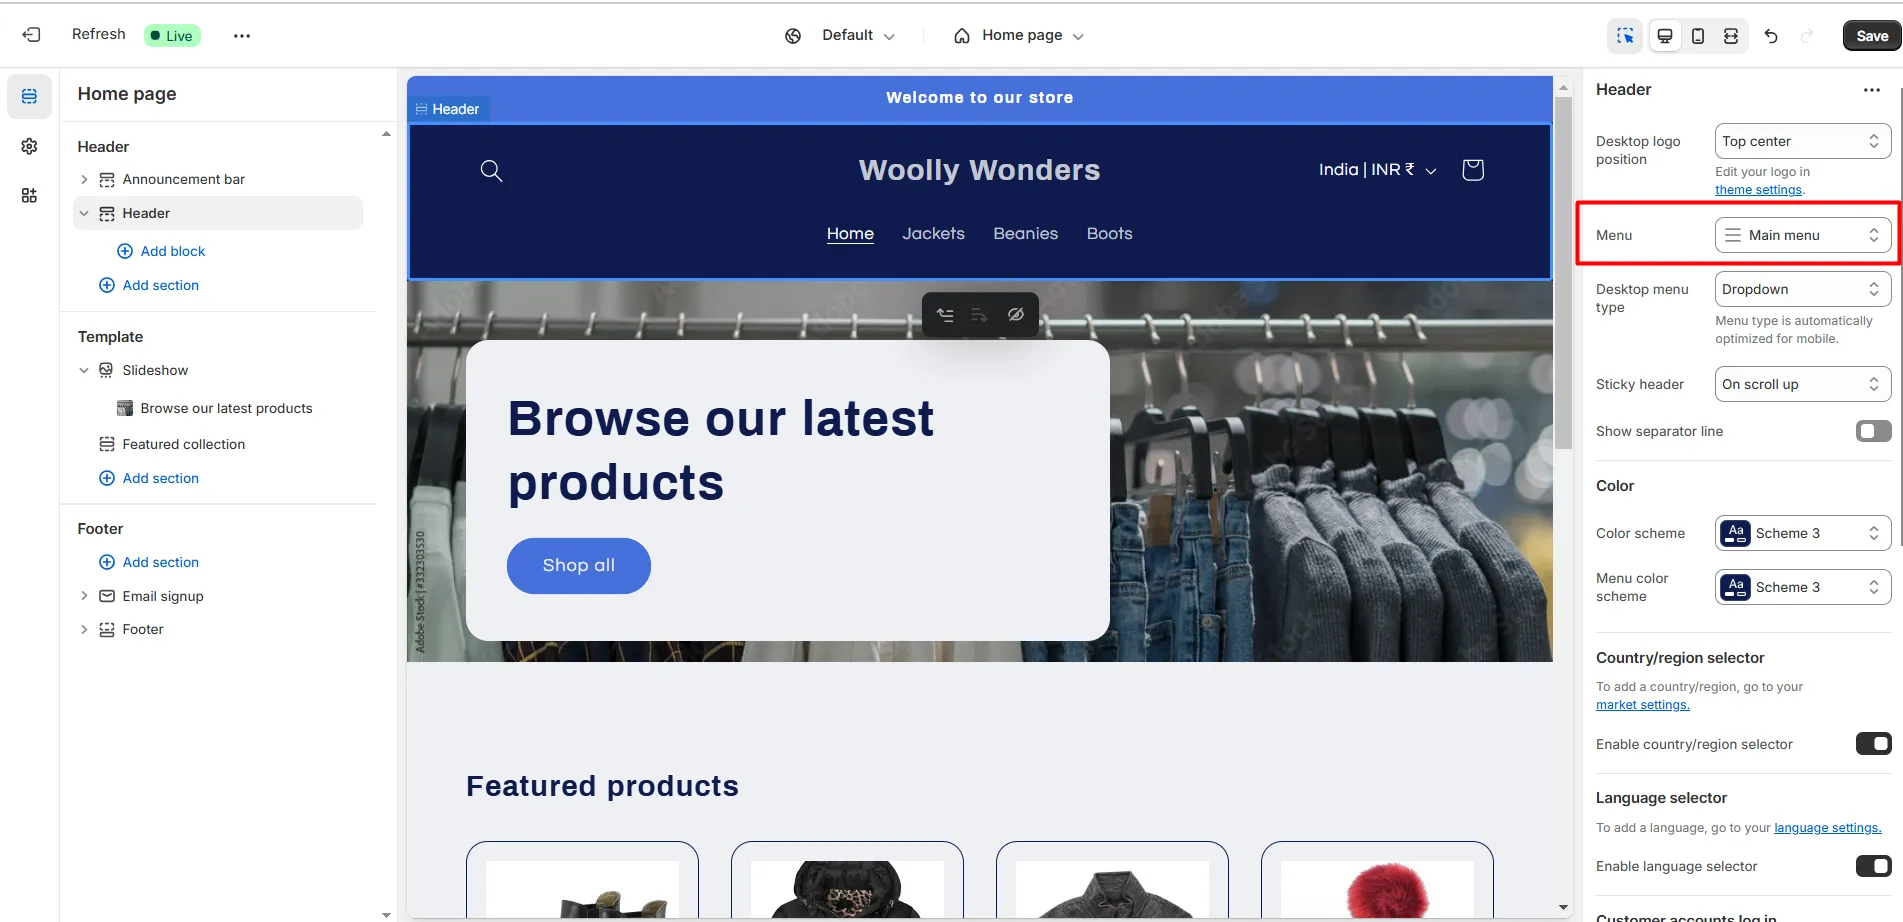
- In the right hand editor, select "Main menu."
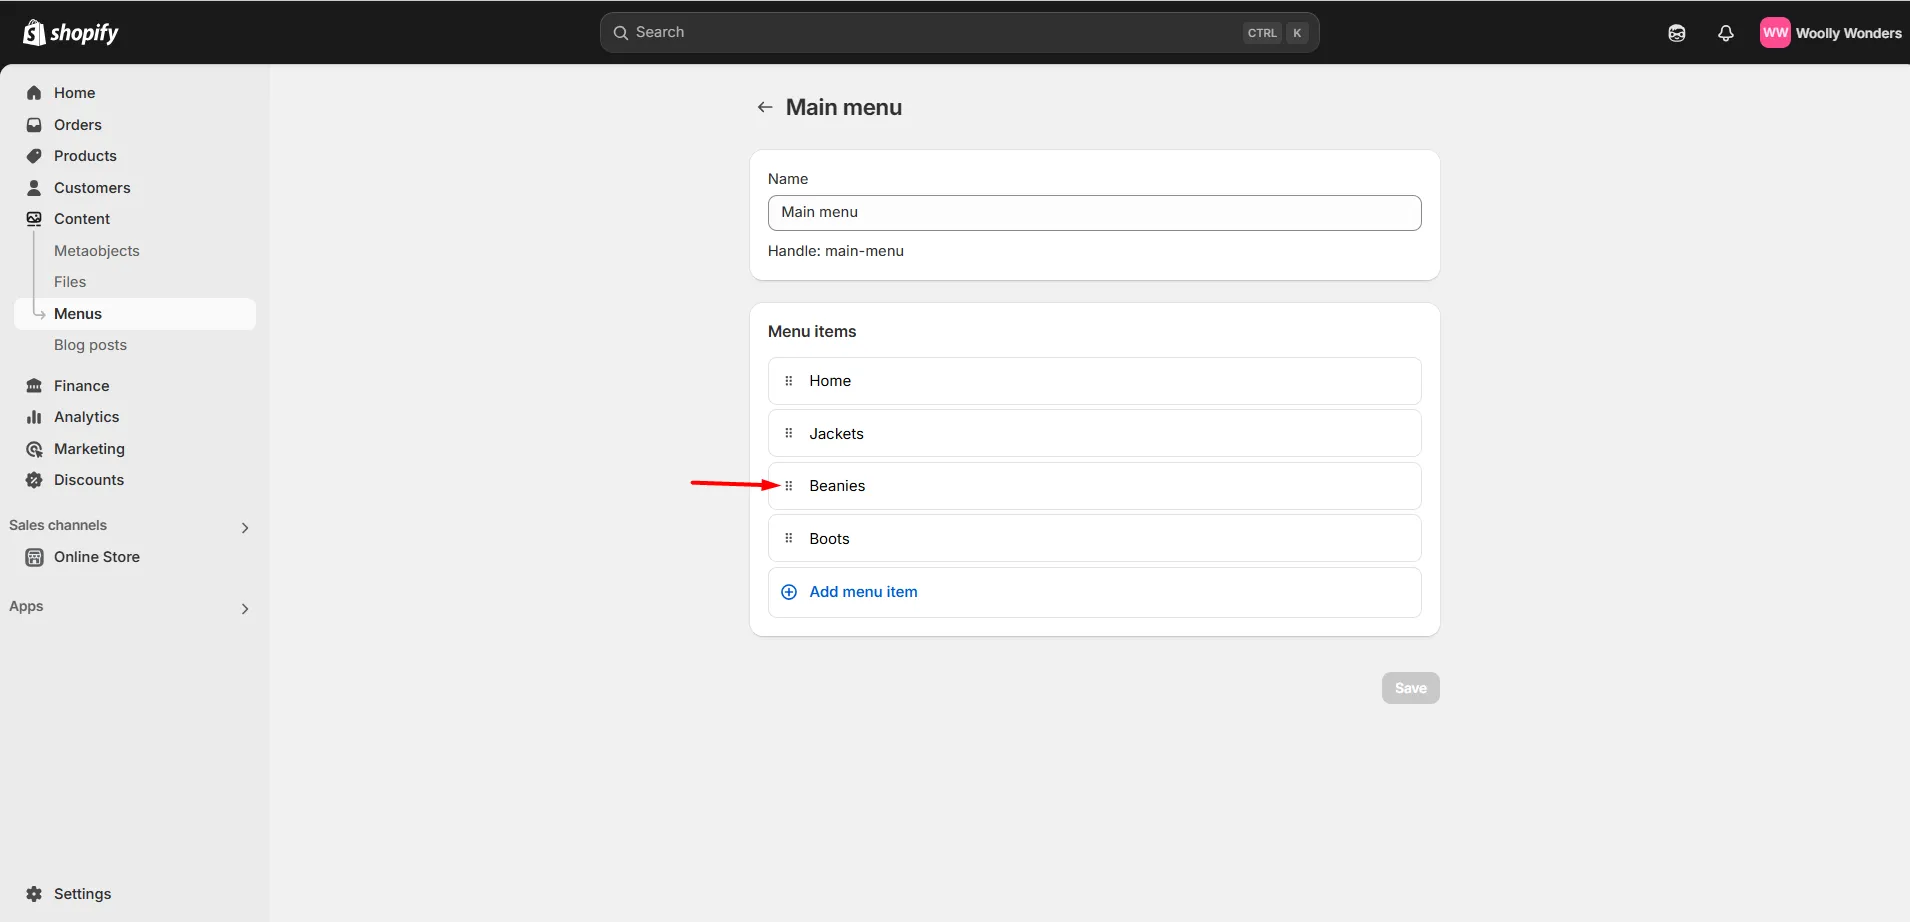
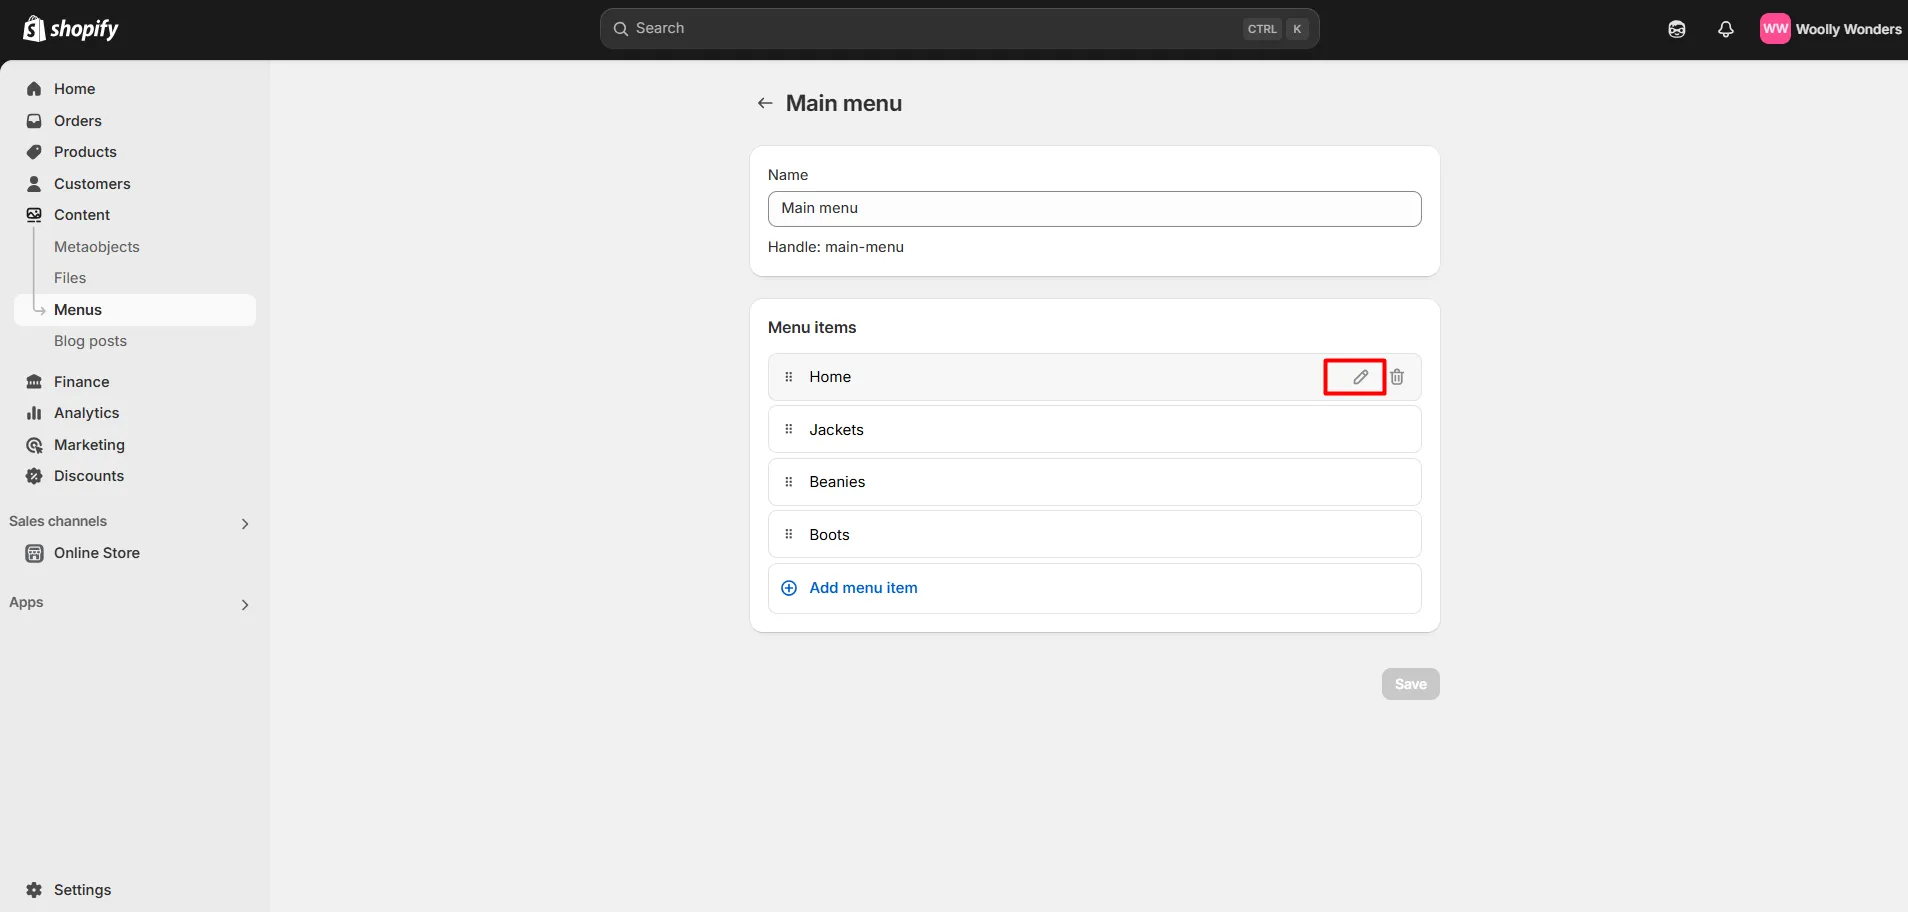
- You will go to the “Main menu” editor, where you can add or remove menu items or adjust their order. To rearrange items, simply drag and drop them into your preferred positions.
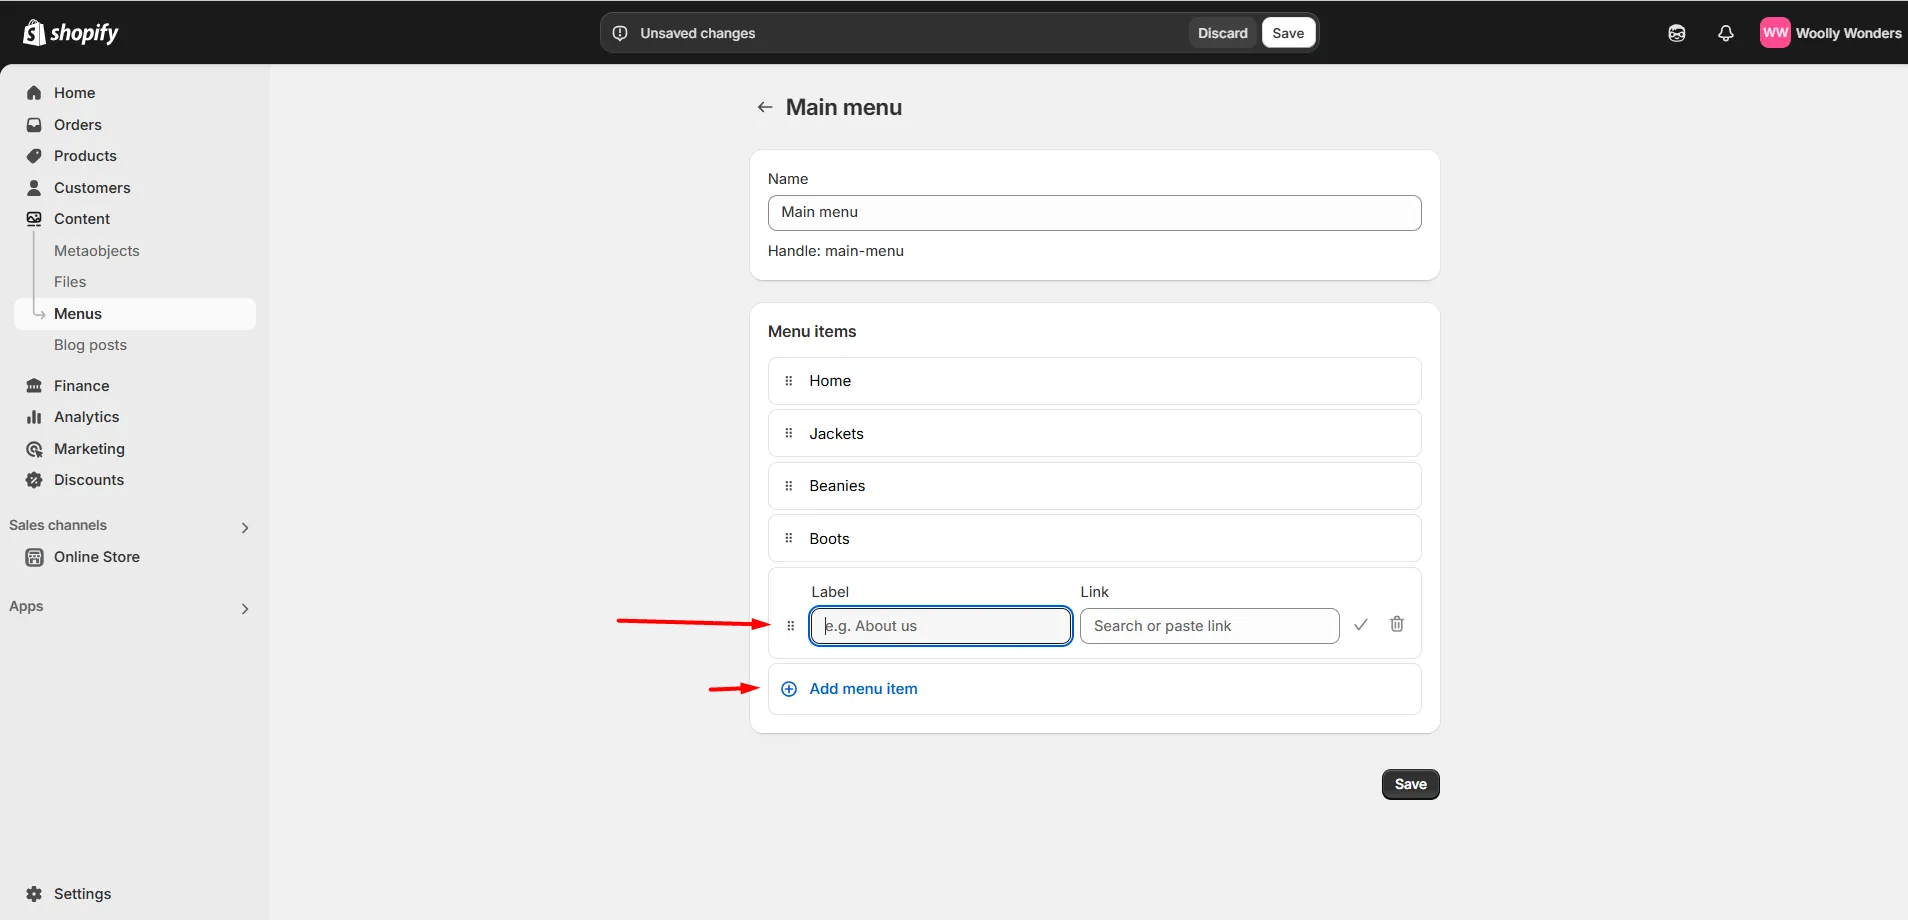
- To add new items to the menu, click “Add menu items.” Enter the name, paste the link, and click “Add” to save your changes.
- You can modify existing items by clicking the “Edit” button and applying your changes.
To Be Remember: You can also edit the menu in the “Navigation” section under “Online Store” in your Shopify admin.
Additionally, you can customize the menu by selecting the “Desktop menu type” and adjusting the padding and margins.
Step 5: Save and Publish
Shopify Header HTML Example: Basic Structure
In Shopify, you can create a header using the <header> tag.
Here is an example of the basic structure of a header in HTML:
<header>
  <div class="header-logo"><a href="/">
    <img src="/logo.png" alt="Site Logo"></a>
  </div>
  <nav class="header-nav">
    <ul>
      <li><a href="/">Home</a></li>
      <li><a href="/collections/all">Products</a></li>
      <li><a href="/about">About</a></li>
      <li><a href="/contact">Contact</a></li>
    </ul>
  </nav>
</header>
Explanation:
1. <header>: Defines the header section of your webpage.
2. Logo Section: Contains a clickable logo linked to the homepage.
3. Navigation Menu: An unordered list (<ul>) is used for the menu items, with each item being a link (<a>).
Changing Header Text in Shopify
Here's an example of how you can change header text in Shopify using both the Theme Editor and Code:
Step 1: Use the Theme Editor
1. Go to Themes > Customize in your Shopify admin.
2. Navigate to the Header section.
3. Look for options to edit the logo text, menu text, or announcement bar text, depending on what you want to change.
4. Alternatively, go to your Shopify admin and navigate to Online Store > Themes. Click on actions > edit code for your active theme, and you’ll see a file browser on the left. Look under the sections folder for the file named header.liquid.
5. Find the line of code responsible for the text. For example:
<h1 class="site-title">{{ settings.store_name }}</h1>
6. Replace {{ settings.store_name }} with custom text or a dynamic variable.
7. Style the text using CSS:
.site-title {
  font-size: 24px;
  font-family: 'Arial', sans-serif;
  color: #333;
}
Impacts of a Well-Designed Shopify Header
A well-designed header impacts your store by enhancing user experience, branding, and conversions. Here are some examples of successful Shopify stores.
- Stronger First Impressions
A clean and professional header creates an immediate positive impression.
For example, Gymshark, a popular Shopify store, uses a minimalist header featuring its logo, a clean navigation menu, and a simple search icon. This layout instantly communicates the brand's focus on fitness and simplicity.
- Improved Navigation
A well-organized header helps visitors quickly find what they need.
For example, Allbirds, known for sustainable footwear, includes a navigation menu with clear categories like “Men,” “Women,” and “New Arrivals,” paired with a prominent search bar. This structure ensures users can explore their products effortlessly.
- Reinforces Brand Identity
A header with a distinctive logo and color scheme strengthens brand recognition.
For example, Heinz (Shopify-powered) uses their iconic red and white color scheme in the header and a simple navigation bar, ensuring their brand stays memorable and cohesive.
- Encourages Conversions
Including key features like a cart icon and promotional banners in the header can drive sales.
For example, ColourPop Cosmetics uses its header to showcase discounts and free shipping offers, enticing customers to shop more.
- Enhanced Mobile Experience
A responsive header ensures mobile visitors have the same seamless experience.
For example, Kylie Cosmetics features a compact, mobile-friendly header with a collapsible menu, logo, and cart icon, making browsing and shopping on smaller screens easy.
Wrapping Up
So a custom header may look like a small detail, but it plays an important role in welcoming visitors, showing your brand, and enhancing your store's appearance. Following this guide, you can create a header that improves user experience and grows conversions.
FAQs
1. Can I create a sticky header?
Yes, most Shopify themes include a sticky header option in the Header settings.
2. Can I add an announcement bar to my header?
In the theme editor, enable the announcement bar under the Header section.
3. How do I change the font or color of my header?
Change the font or color of your header, go to Themes > Customize > Typography or Colors, update the font style, size, or color, and Save.

![Shopify Launches Winter’26 Edition: RenAIssance [Key Updates Explained] Shopify Launches Winter’26 Edition: RenAIssance [Key Updates Explained]](https://www.identixweb.com/wp-content/uploads/2025/12/11-12-Thu-Blog-Shopify-Launches-Winter-26-Edition_-RenAIssance-1.webp)

About the author
Bhavesha Ghatode
Explore Content with Bhavesha, a passionate and dedicated technical content writer with a keen understanding of e-commerce trends. She is committed to sharing valuable insights, practical assets, and the latest trends that can help businesses thrive in a competitive environment.