When we select any Shopify theme for our store, we get default page templates for every page such as homepage, product page, collection page, cart pages, and so on. Customizing the default page templates for any product or collection applies to all the products or collections in the store. In case you need a different layout for different categories of products, you need to create a custom product template in your theme.
Welcome to our guide on creating a custom Shopify product template! For every merchant, getting conversions by giving a seamless shopping experience to customers is the ultimate goal. And to achieve this goal, everyone implements unique options ro make their product/service unique from others. And everything starts from providing a customized Shopify product page or a custom Shopify theme. In this guide, we will see how to create custom product pages in Shopify.
What Is Custom Shopify Product Template
Custom Shopify product template refers to a personalized design or layout created for displaying individual products on your Shopify store. Suppose you want to build a clothing store where you can sell products for men, women, and kids. You may need to design different page templates with different size charts for men, women, and kids.
Don’t worry! It is possible and you can do that easily by following this guide and also you can make use of Shopify custom theme. Or if you would like to add some extra selling options in your store and delight your customers then you can make use of our Shopify app called iCart Cart Drawer Cart Upsell by which you can show upsell, cross-sell, bundles, discounts, progress bar, etc. You can show these options in cart drawer, cart popup or cart page.
How To Add Customization for Custom Products On Shopify Product Page
Benefits of creating custom Shopify page template
There are several benefits in creating product pages or custom Shopify product page template:
Brand consistency: Custom product pages help you to maintain your brand identity. It provides a consistent look and feel to your store’s pages.
Improve user experience: You can create customer-centric product pages that caters to specific preferences of your target audience.
Customization: You can get full control over customization. You can customize the color scheme, text, design/layout and make it more appealing to your customers.
Flexibility: Integrates flexibility or unique functionalities which may not be found in standard Shopify product page templates.
Marketing & SEO: You can improve your SEO by optimizing your product page template with proper strusctured data markup and all.
Steps to Create Custom Product Template in Shopify
We are going to see 2 methods for creating custom product pages: (1) For Shopify 2.0 themes (2) For all Shopify themes
METHOD – 1 (Use the below steps for Shopify 2.0 themes only)
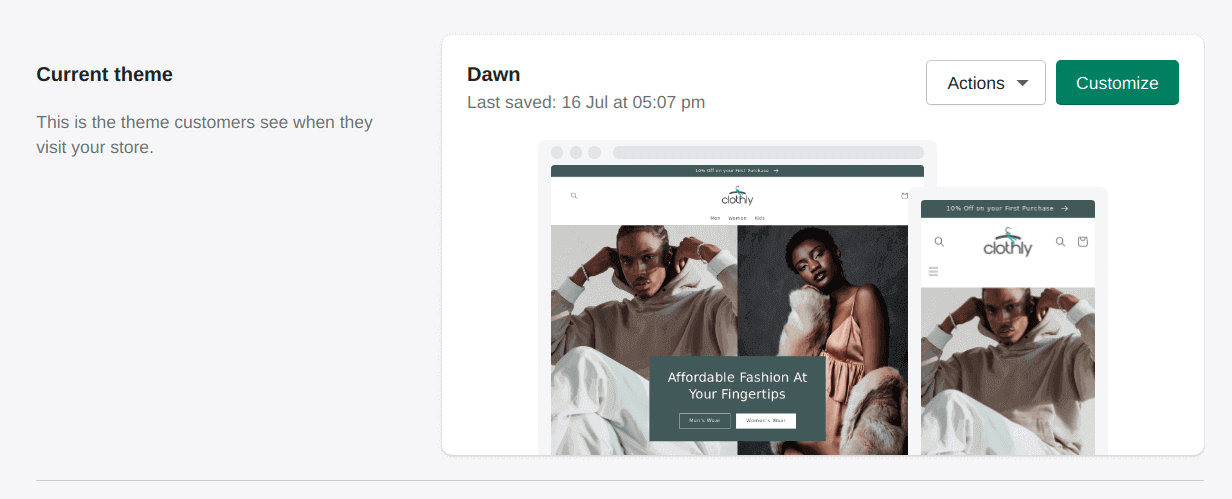
Step 1: Go to Online Store > Themes.
Step 2: Click on the Customize button.
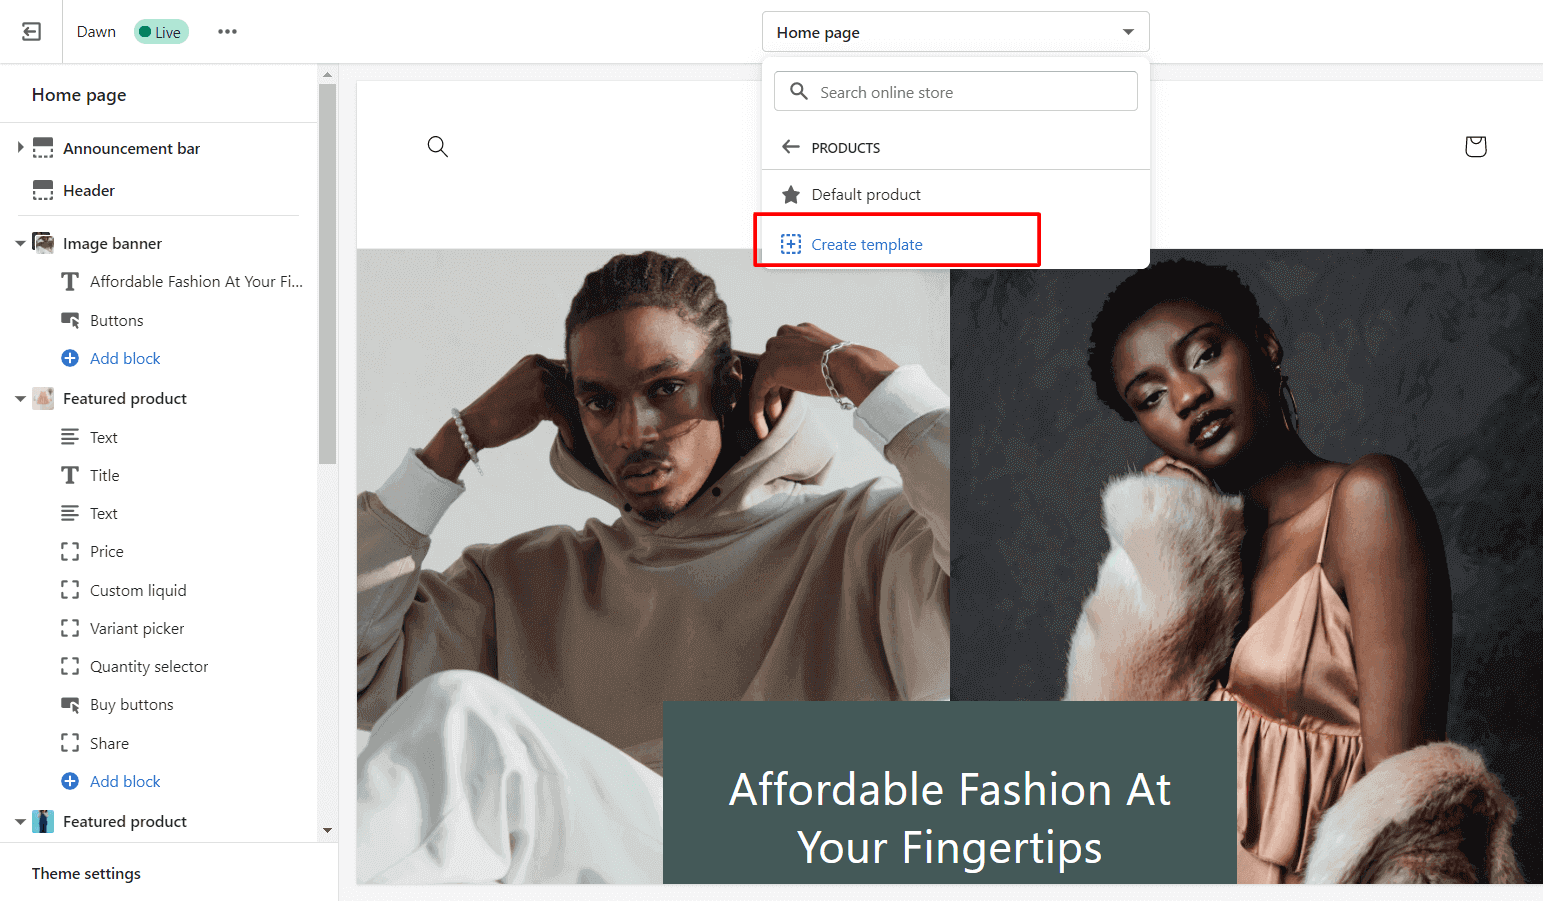
Step 3: Use the dropdown menu to select the “Product” template type.
Step 4: Click on Create template.
Step 5: Give a name to your new product page template.
Step 6: Select the product template type. You can select from all the product templates available in your theme. If you have not created any, it will show only the “Default product” in the option.
Step 7: Click on Create Template button.
METHOD – 2 (Use the below steps for all Shopify themes)
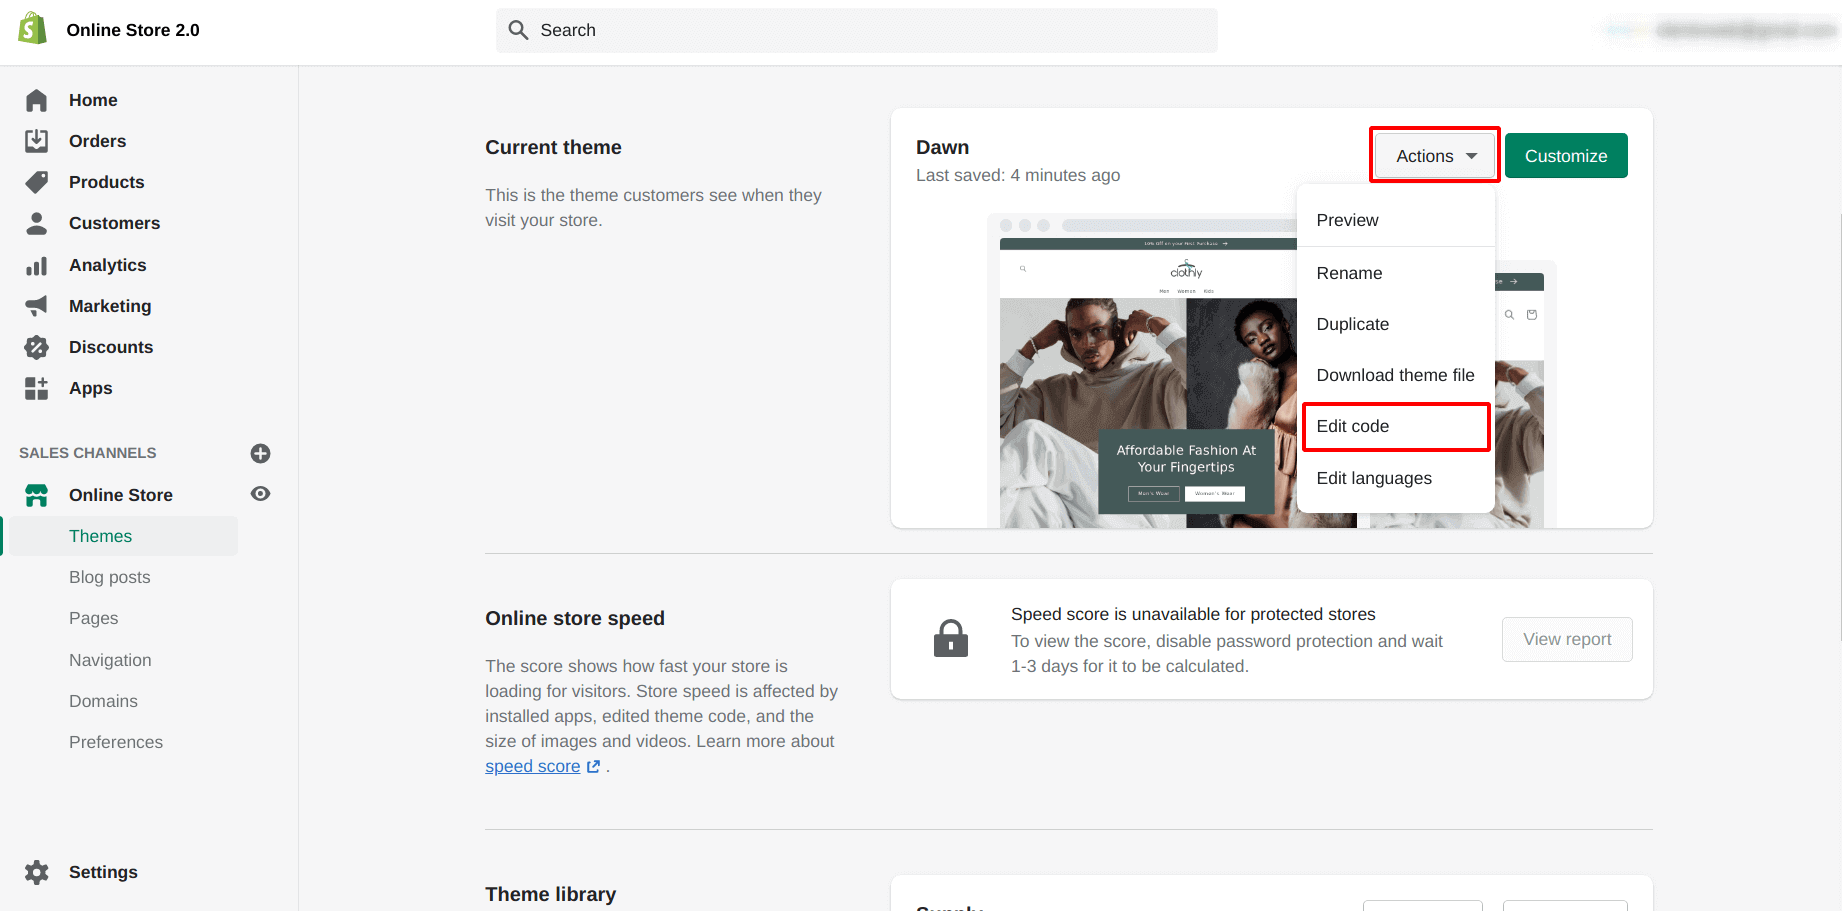
Step 1: Open Online Store > Themes from the Shopify Admin.
Step 2: Go to Actions > Edit Code.
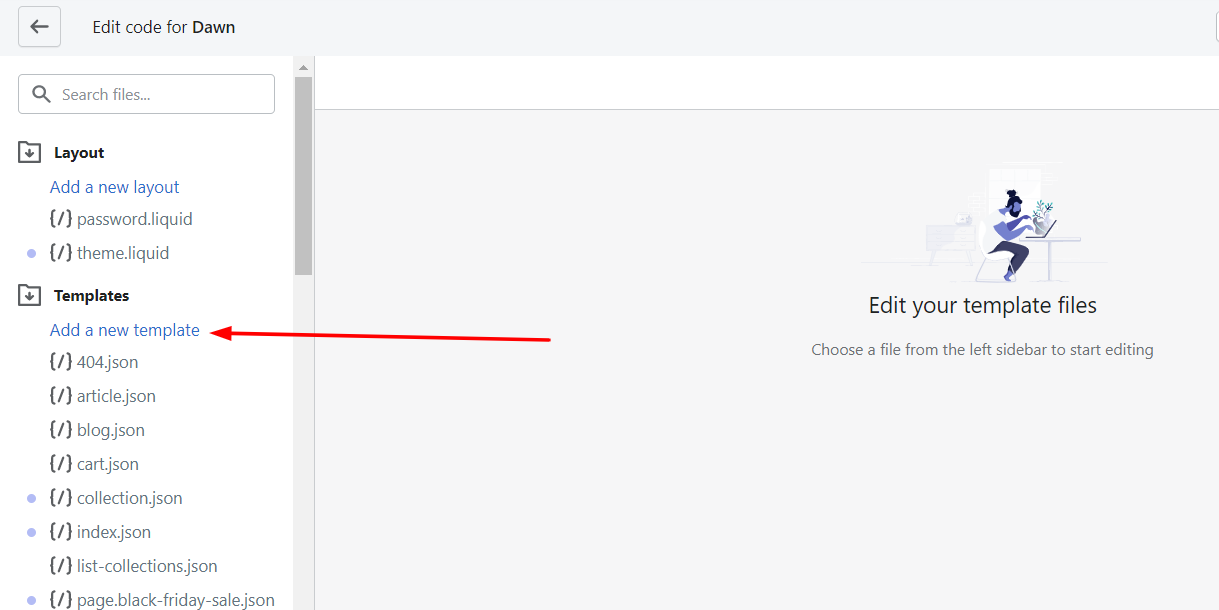
Step 3: Under the Templates folder, click on Add a new template.
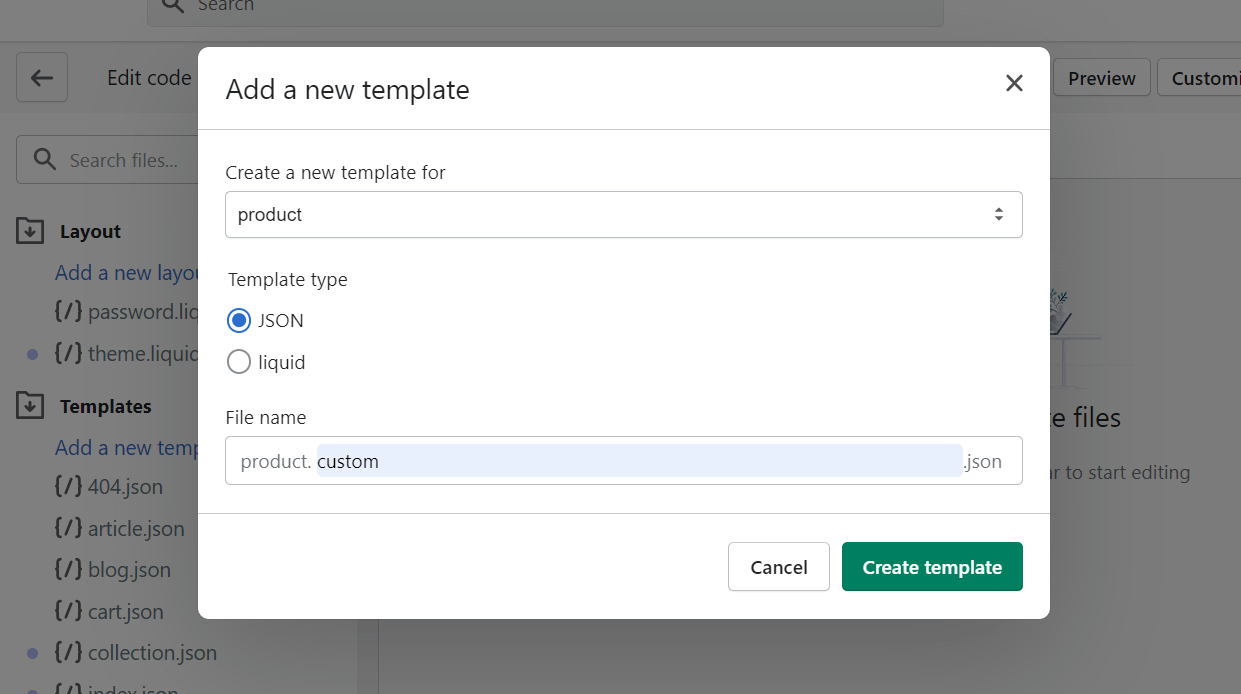
Step 4: Select “product” from the Create a new template for dropdown list.
Step 5: Keep the Template type “JSON” if using Shopify 2.0 themes or “liquid” for other Shopify themes.
Step 6: Give a name to your new product page template.
Step 7: Click on Create Template button.
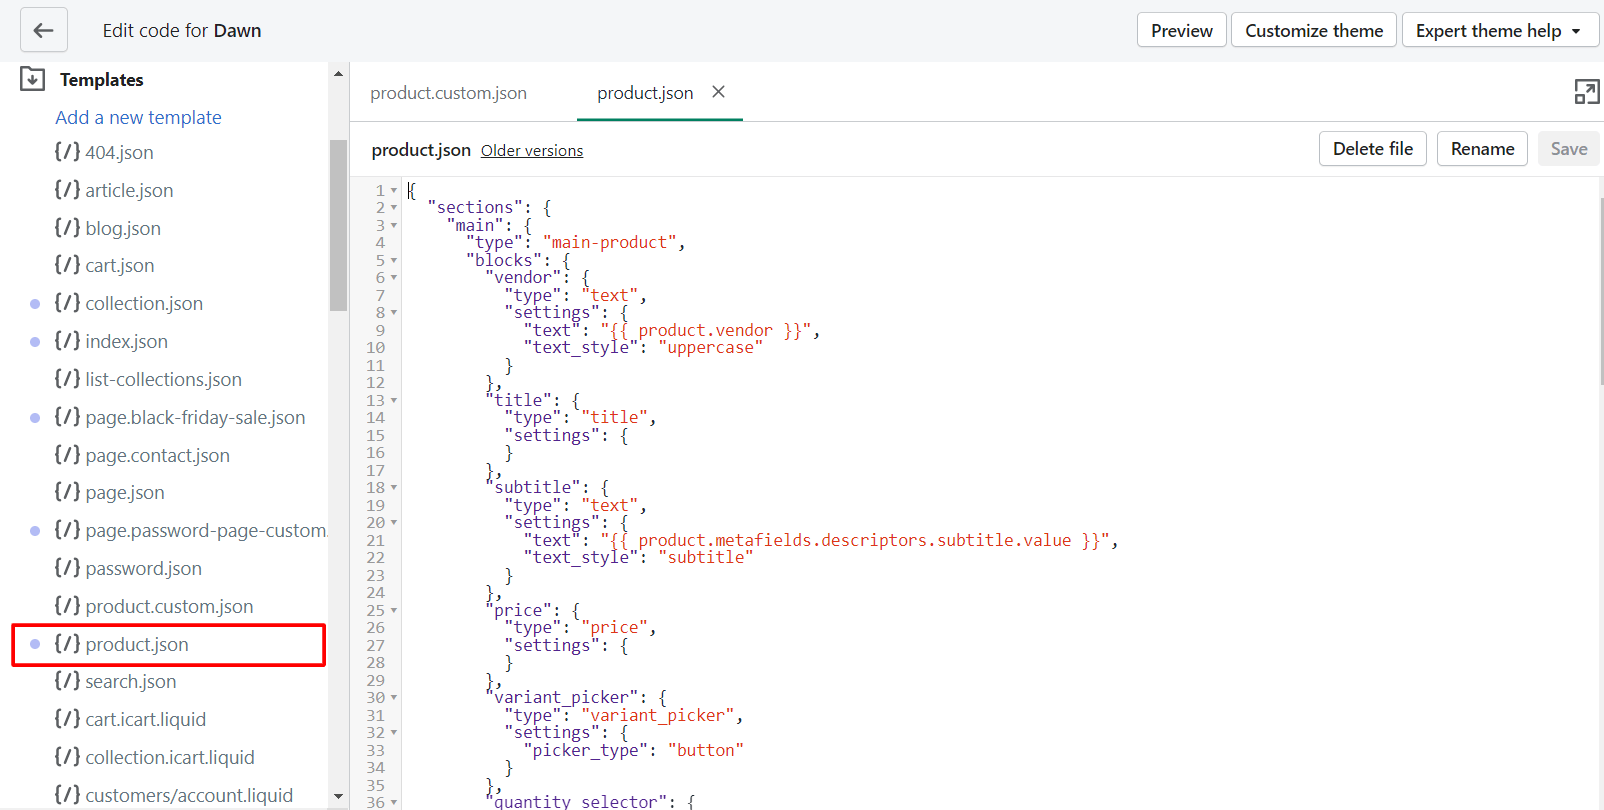
Step 8: Now remove all the code from the newly created product template. This file should be blank.
Step 9: Open product.json (for Shopify 2.0 themes or “product.liquid” for other themes) from the Templates folder.
Step 10: Now copy all the code in the product.json and paste it into your new product template.
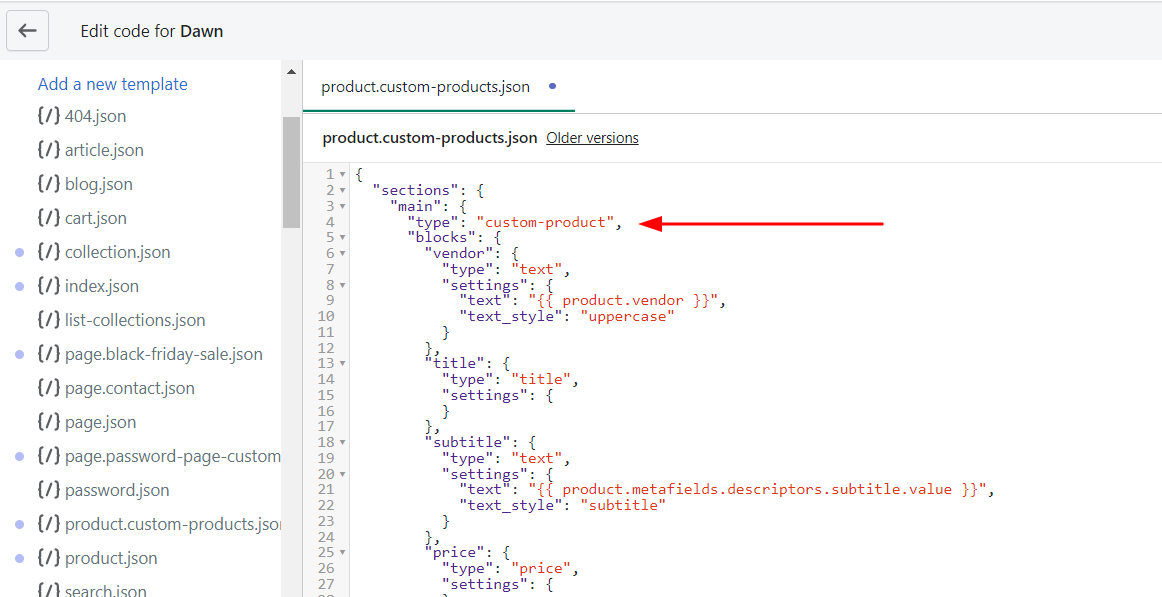
Step 11: Replace the “main-product” with “custom-product” in your new product template.
Step 12: Save the changes by clicking the Save button.
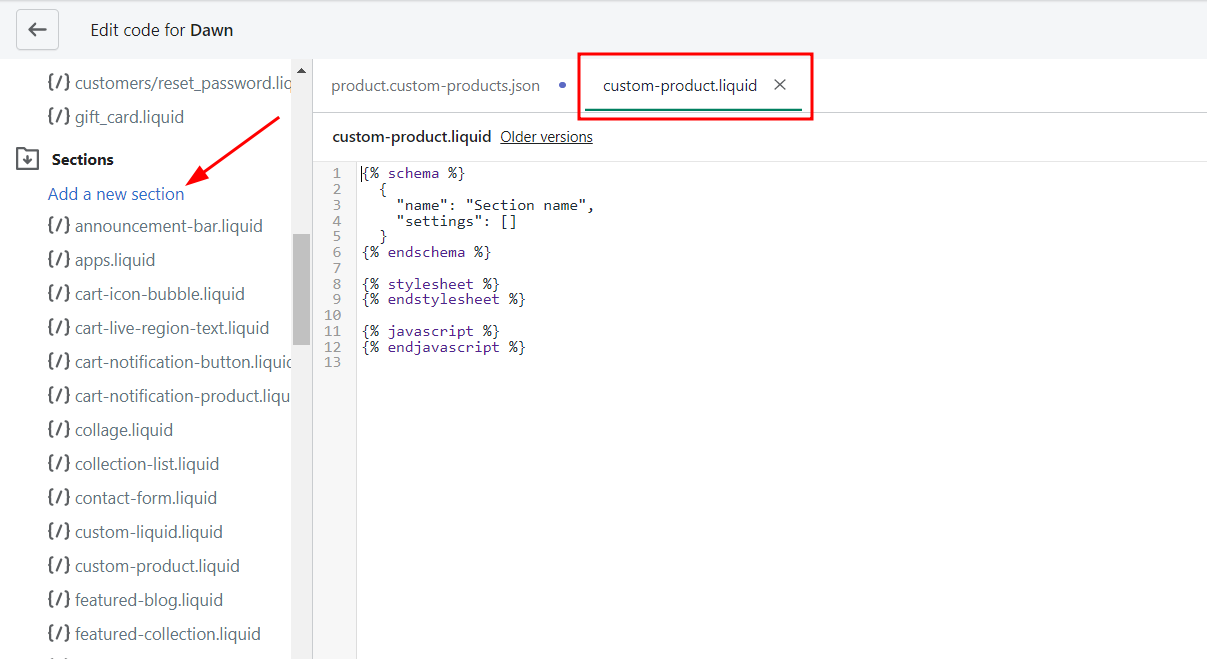
Step 13: In the Sections directory, click Add a new section.
Step 14: Name your new section file ‘custom-product‘.
Step 15: Click Create section. Your new file will open in the code editor.
Step 16: Delete all of the default code.
Step 17: Copy all of the content from your main-product.liquid file (in the Sections directory), and paste it into your new custom-product.liquid file.
Step 18: Click Save.
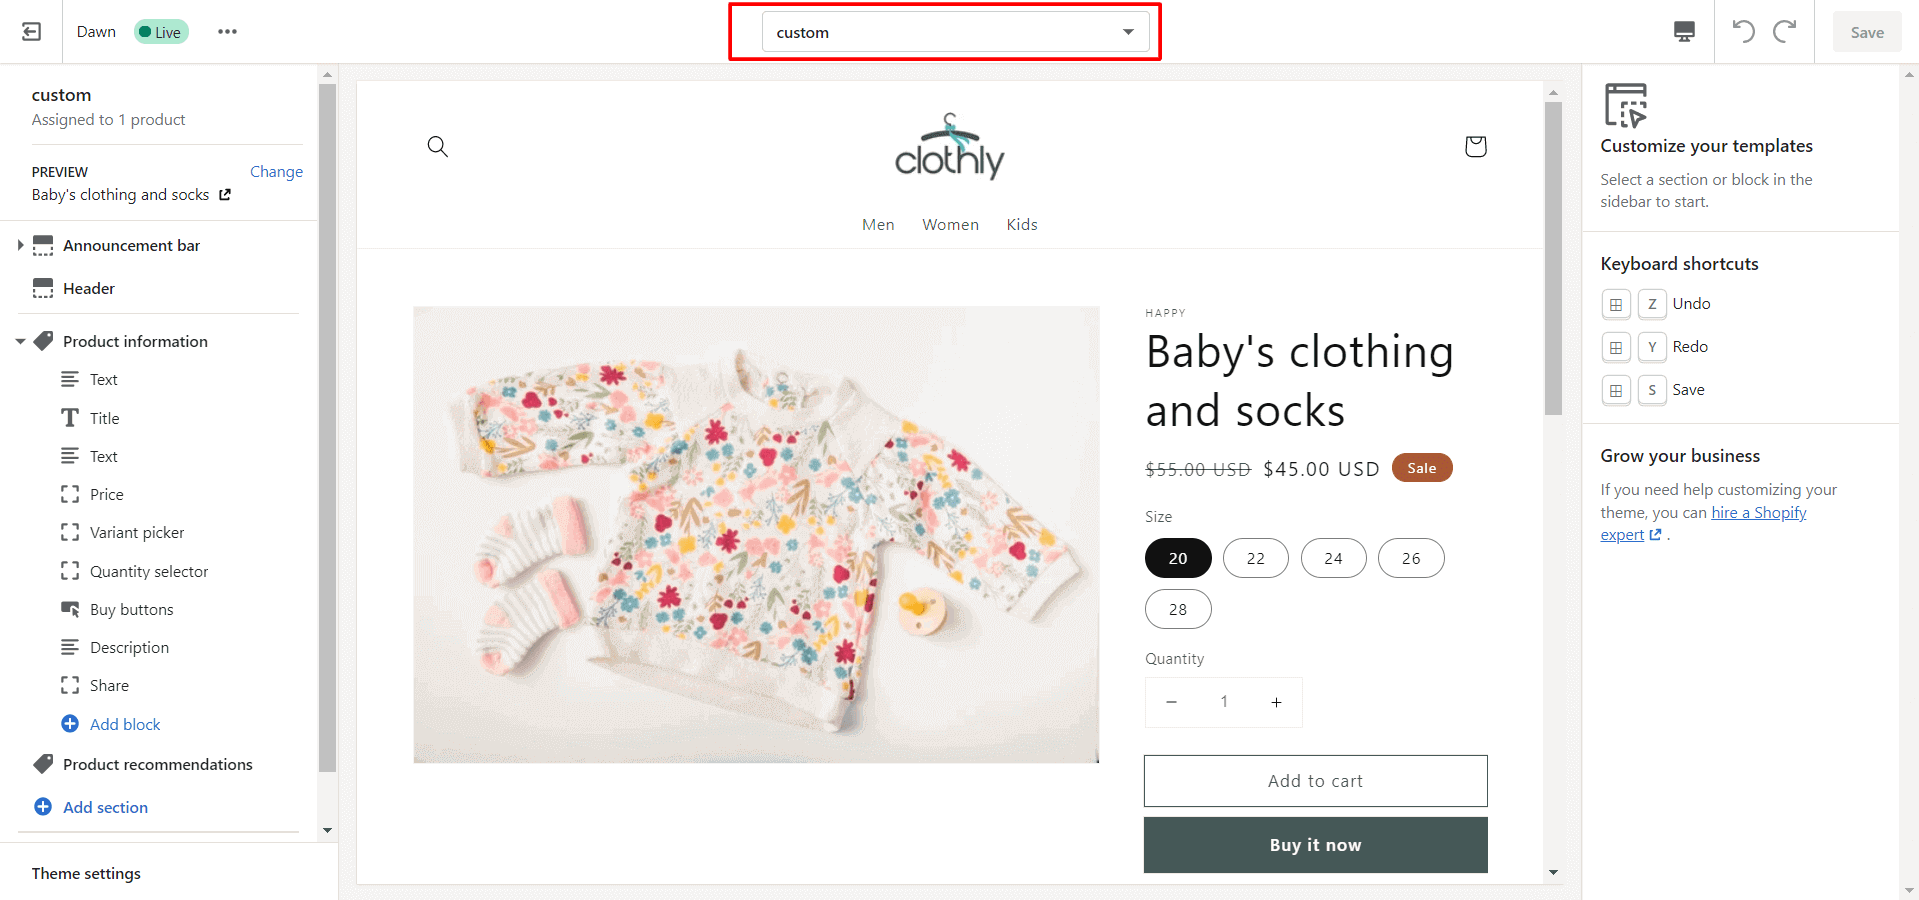
Now you can customize this new product template from the theme editor. For that go to Online Store > Themes and click on the Customize button.
Then, open the custom product template and customize it using Shopify sections, blocks, and metafields.
Shopify Metafields Guide: Overview, Types, Manage 2.0 Metafields
What’s next? After you are done with the product page design, you need to assign products to the new product template. Let’s see how to do that.
Steps to Change Product Page Shopify
Step 1: Click on the Products tab from the Shopify Admin.
Step 2: Open the product you want to assign to the custom template.
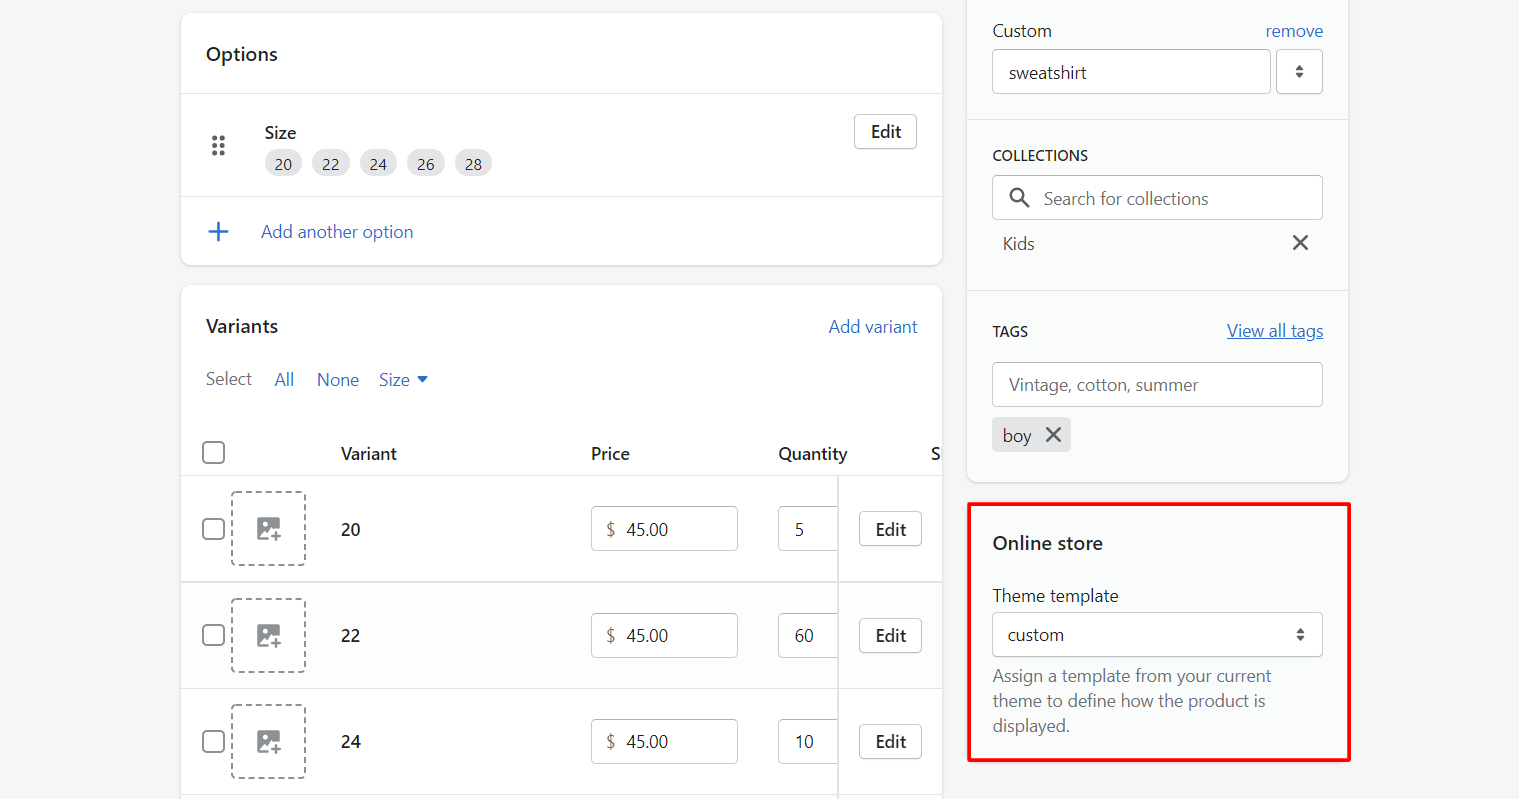
Step 3: Scroll down to the Online store section.
Step 4: Now select your custom template from the Theme template dropdown.
Step 5: Hit the Save button.
Congratulations! You’ve successfully created a custom template for your products. This way, you can create custom templates for other pages like collection, cart, customer account, and so on.
Hope this guide helped you. For more helpful guides you can explore our blog section.




Thanks! This was helpful. Now I just need to figure out how to get the form inputs I’ve added to show up on the cart page so the customer can see their personalization on an item. Then get it to send through to me when they order. I’m gonna need some help lol
Hello Cassia,
Thanks for your response! 🙂
I think this needs coding, so I would recommend posting a question to Shopify Community or getting help of Shopify experts.
I have created custom page template, it is possible to get collection filters in it ?
Yes you can create filters in collection from the Shopify admin or through metafields.
From your Shopify admin, go to Online Store > Navigation.
Scroll down to Collection and search filters.
Click Add filters.
Select one or more filter options from the list of available filters.
Click Done to save your product options.
Click Save to update your collection and search filters.
To create filter using metafields refer to this doc: More information for collection MetaFields
I keep getting an error message saying “Error: Section type ‘ecotoothpastedispenser-product’ does not refer to an existing section file”, i have tried splitting the words and putting a different name but still?
Hello,
Please check the added section type matches with the name you are trying to search again. Or put a hyphen or a dot between the name to separate it and see again if the error occurs or not.
Hi – I had the same problem. The order of instructions is wrong. You have to set up the new section first, then save the new JSON file. I’m not sure yet, but I think the instructions also left out to rename “MainProduct” in the new liquid template to “CustomProduct”, but I haven’t tested it yet.
Hi, I’m having the same trouble – did you mange to figure it out? thanks
What do you do if each of your products needs to have different information in the dropdowns? Our products each have different ingredients, specific to that one product. Does that mean we need to make a new theme for every product? That doesn’t seem right? What am I missing? Thanks!
Hey Nicole,
To add different ingredients for each product, follow these steps:
Step 1: From your Shopify admin go to settings > metafields > products and create ingredients metafield.
Step 2: Now from your Shopify admin itself go to the Products tab and select the product page on which you want to add ingredients.
Step 3: From the product page you can find the metafield that you have created. Choose that, add the information and click the save button.
Hi, great tutorial! But I have a problem when I want to assign my product page to the custom template, I don’t see the “custom” in the theme template dropdown, as I correctly follow the instructions above, do you have any idea of where the problem could come from? Thanks in advance, have a good day, Robin.
Hello Robin,
Which method have you followed?
Hello, im having the same problem and i used method 2
this was really helpful. Thank you for sharing.
Thank you so much!
This was really helpful, thanks so much. Do you know if there’s anyway to add products in bulk to a theme or is it only one by one?
Yes, you can add multiple products by making an Xls file of your products and then import it to your store from the products page.
I want to assign my products the “default product template” but in the Online store section, under the dropdown menu to select a new theme template, I can’t see that option anywhere so I am not able to assign anything. This also doesn’t allow me to edit my product description to the bottom because in the article I was sent says that I have to choose “bottom-description” template, but none of the templates are there. What do I do and how can I fix this?
I have 15 products in shopify. Can we create 15 custom templates for every product?
Yes You can do it. Follow the above process and create a multiple product template file in JSON format and after adding product, In product page, the below bottom right corner, assign the different different template to different different product individually as well.
Thanks & Regards
Nimish Agarwal
Hi, Nimish! Could you please provide step-by-step instructions on how to create custom templates for every product? I’ve been trying to figure this out for the whole day but was only able to create a custom template for one product. I would truly appreciate your help.
Yes, it’s possible. Check this link and read the Bulk template changes section.
Helpful, but how do you do this in an unpublished theme that is radically different from a current theme?
It doesn’t matter how good your content is, I can’t stay on your site with that super annoying (1) new message flashing in the title bar.
Ok. We will try to improve this from our side.
This was very easy to follow and super quick. Answered the questions I had perfectly! Thank you <3
So I added everything and I Placed an order by putting in the customization I wanted for a product. But when I get the order on the back end I don’t see the custom part. How do I view what the customer puts on their order?
Please contact the Shopify support team for additional customization options.
I want to create weight base product in Shopify user fills in the weight and automatically calculates the product price on the product page
Example: I need to buy 1.5 kg of fish
fish default price is $20 but when the user fills the 1.5 in the field then the product price automatically calculate
For more customization options please contact the Shopify customer team.
Why The New Template I Created Cannot Be Shown In The Choice Of Theme Setting In The Product Admin? 🙁 Please instruct and help
Kindly contact with the Shopify support team for additional requirements.
I will immediately snatch your rss as I can not in finding your email subscription hyperlink or newsletter service. Do you have any? Please permit me realize in order that I could subscribe. Thanks.